
You’re minding your own business, cleaning your car like always. You see the damaged parts that are there from regular wear and tear and think to yourself that now would be a great time to repaint those areas.
That’s the thinking process that often leads to overspray. When droplets from your paint blow beyond your targeted area to other parts of the vehicle, you can affect the quality of the update.
If you get a wind gust while using an air sprayer, the overspray issue can occur quickly. It can even happen in an indoor paint booth if someone opens or closes a door too rapidly, creating air movement.
When you have the right tool to correct this issue, you won’t need to worry about the problems with overspray ever again.
Overspray on Car: The Magical Tool to Remove Overspray from a Car
When you have overspray on your car, the best tool to use is a clay bar. This product can remove unwanted materials without impacting the clear coat and surface panels. Even if you have chemical fallout and fire soot, corrections are possible.
If you have a clay bar to use, you can restore the damage to your vehicle’s exterior without a significant time investment. Here are the steps you’ll want to follow to get the job done correctly if you’re dealing with an overspray issue.
Additional options include rubbing alcohol, paint thinner, WD-40, and acetone, but your best choice for a successful result is a clay bar.
1. Get a 100% Authentic Clay Bar
You can find chemical sprays and cleaners that say they’re the equivalent of a clay bar. You can even find detailing products that say they offer these benefits, but they are actually imposters. There must be a 100% authentic clay bar available to take care of your overspray problem.
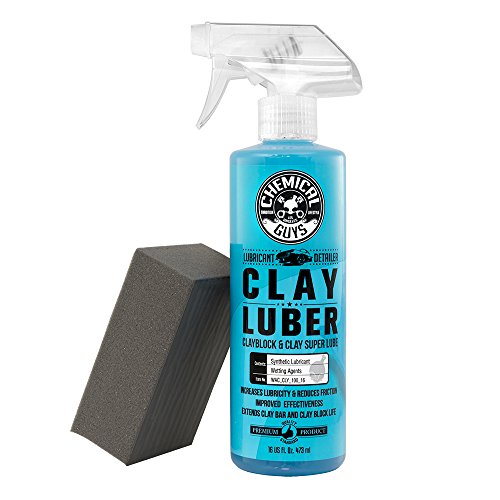
I like to use the Chemical Guys Clay Block Kit for overspray issues. It removes everything from tar, bugs, and water spots while keeping your paint and glass surfaces looking beautiful. It doesn’t remove or strip the wax away or contain harsh abrasives.
One purchase can help you finish the work on up to 15 full-size vehicles.
You will need a lubricant to work with the clay bar. If you decide to use a different product, anything from soapy water to a cleaner spray typically works.
2. Prepare the Clay Bar to Work
Once you have a clay bar at home to use, you’ll notice that the product is pretty hard. You’ll need to dip it in warm water and squeeze it to make it soft. You don’t want to apply the brick to your vehicle’s exterior because that could scratch the paint.
After you’re finished with the work, store the clay bar in an airtight container away from pets or kids so that you can preserve its quality.
3. Moisten the Overspray
Your overspray is a dry patch that needs to get wet so that you can use removal products to finish the work. It helps to use a damp cloth to wipe the entire area after spraying it with soapy water or a clay bar spray.
4. Use the Clay Bar
Slowly rub the clay bar onto the overspray spot that requires correction. You’ll feel some resistance when you start, but that’s what you want. If you don’t encounter any friction, it means that you’re not working under the conditions where this magic tool can perform.
The overspray might have lost its wetness. You can spray it down and try again. Keep going until you have the affected area off.
5. Apply the Final Touches
Once the overspray is off, you can wipe the area clean with a microfiber towel or cloth. Apply an auto body cleaner to the site, allowing it to work for a couple of minutes (or according to the manufacturer’s instructions) to remove any remaining debris.
After you complete this step, you’ll have a smooth and shiny finish that maintains your vehicle’s clear coat.
Are There Other Ways to Manage Overspray on a Car?
If you have overspray on a car and the clay bar doesn’t seem to be working, you might decide to use some alcohol. It can remove any paint, which means it can get the job done.
The problem with alcohol is that it can also adversely impact your clear coat if you misapply it.
You’ll want to start the work by taking a little alcohol and rubbing it on the affected spot. You’ll need to measure the quantity based on the spot’s size to ensure you have enough available to complete the process.
Once the alcohol is on the overspray site, you’ll need to wait until it merges into the spot correctly. It takes time to dissolve the unwanted area, but a high-quality product will work in a few seconds.
Let the alcohol sit on top of the overspray to clear the damage and dryness, trusting that it will work.
I like to use medical-grade isopropyl alcohol for this work. After I get it into application bottles, I can apply the fluid to the overspray spots directly to ensure that it can work quickly without creating more damage.
Once the overspray is dissolved, use a microfiber cloth to clean away the messy surface. You’ll typically see a puddle that needs to get removed. If you see any spots that remain, you can lightly scrape them away.
After the area is clear, you can dip a clean towel into soapy water to rub the surface with it. You also have the option to rinse the exterior by pouring the liquid over the previous overspray to remove any lingering alcohol and prevent clear coat damage.
◼️ What Happens to the Vehicle’s Finish?
A vehicle’s finish is not typically damaged if you follow the correct methods and steps to remove overspray. If you want more of a guarantee for your clear coat, the best investment you can make is a clay bar.
You must have a high-quality product to ensure the results are what you want. You cannot compromise here if you’re going to maintain your clear coat.
Factors That Cause Overspray When Working on Vehicles
When you start painting your vehicle (or any other surface), you’ll discover that overspray can be a very common issue.
The good news is that it is generally easy to prevent the primary causes of overspray. When you have a high-quality clay bar available to correct the issue when it happens, you can clean up the mess without worrying about surface damage.
Here are the issues you’ll face when painting with a sprayer that could eventually lead to an overspray problem.
| Wind Speeds: | • You don’t want to underestimate the wind’s power when you’re painting with a sprayer. • If it moves too fast when you work, the droplets will go in unintended directions. • That means you’ll waste more paint, spend more time cleaning, and need to be ready with a clay bar to correct problems. • If you’re painting outside and the wind kicks up, it is time to quit or create a temporary booth. |
| Spray Patterns: | • When you find too much overspray occurring, it could be due to the spray pattern you’re using. • You’ll want to make sure the one you select matches the job you’re trying to accomplish. • If you have a narrow surface to address and you’re using a product that delivers a broad stroke, you’re guaranteed to have overspray unless you’ve protected the surrounding spots. |
| Air Pressure: | • If you’re stuck dealing with overspray on a car, it could be due to the air pressure levels. • When too much air moves through the sprayer, it causes the paint to release from the gun too fast. • That results in a high-impact splatter that looks lumpy. • It can also cause drips and runs that can impact other areas of the vehicle. |
| Target Distance: | • How close you stand next to the car can also determine if you’re creating a high-quality result or one that gets ruined by overspray. • Most beginners tend to stand too close to the surface that requires attention, leading to an unattractive finish and tons of unwanted droplets. • This issue also creates runs and drips. • If you stand too far away, the paint can splatter outside the target zone, creating a similar result. • It will look like dust, which can require extensive work from a clay bar to correct. |
Tips for Preventing Overspray When Using a Sprayer
Overspray can happen in different amounts and sizes. It usually looks like fine dust has settled on your vehicle’s clear coat, although the specks are actually tiny paint droplets.
These tiny particles like to float in the wind, affixing to textures outside of your intended area.
If a bigger droplet settles somewhere, it’ll look and feel more like a hard raindrop.
Although paint is the typical overspray issue you’ll face on vehicles, it can also apply to stain or varnish.
If you’re working on your vehicle, here are some ways that you can stop overspray from happening before it starts.
◼️ Create a DIY Spray Booth
Working in an enclosed area is the best way to prevent overspray from happening. Even if you only use a plastic sheet to create a portable paint shelter, it’ll help you apply the product better without having everything go everywhere.
You’ll need to bring the items inside the enclosure before spraying to ensure the results are as intended.
This option works for spraying items you can cover with the sheeting entirely, including an automobile. It isn’t usually available for exterior or interior walls.
◼️ Use Cloth or Adhesive Tape
If you have painter’s tape available to use, you can prevent minor overspray issues. This option works well when you have trim to paint to delicate areas on a vehicle. Since this product removes without leaving adhesive behind, it’s a cheap and practical way to create a high-quality result.
You can also wrap the surrounding area with plastic wrap to prevent overspray from affecting the final result.
Some people might use old newspapers to cover this area. If you take that step, the ink could transfer to your vehicle’s clear coat to create more problems.
You can use a fresh newsprint role, although it is usually cheaper to place a cloth in the affected area.
◼️ Select the Correct Sprayer for the Job
When your goal is to prevent overspray, you’ll want to ensure that you’re using the correct sprayer type for the work. Traditional guns have the highest risk for this issue, especially when working on a small surface.
It might help to work with an airless paint sprayer or an HVLP unit to ensure the job gets done quickly without dealing with overspray problems.
◼️ Use the Correct Pressure
The easiest way to correct an overspray issue is to change the pressure you’re using to distribute the paint, stain, or varnish. When the outcome is drippy or lumpy, it means the pressure setting is incorrect.
If you’re unsure of what pressure setting to use with your sprayer, it helps to start at the lowest one possible. You can work your way up if needed to ensure that the results are what you want to see.
When you blast the paint right from the start, it’s much easier to create overspray that needs a clay bar to remove.
◼️ Find the Best Nozzle Size
When you start painting, you’ll want to think about the nozzle size getting used for the project. Bigger models tend to release more paint, creating a higher risk for an adverse outcome. You might be able to correct an overspray problem by going down a couple of sizes.
It also helps to keep a few nozzles available for your sprayer to adapt to whatever changing conditions you encounter. Some projects have broad applications that require some extra flexibility.
◼️ Increase the Electrostatic Charge
Electrostatic painting uses magnetic fields to apply paint to the exterior metals and plastics found on modern vehicles. If you’re experiencing overspray in these conditions, you’ll need to increase the charge so that the mist gets attracted to the intended surface.
This methodology makes it much easier to create a smoother paint coating because the paint particles are attracted to the surface and bond better. You’ll experience less waste while speeding up your work, but it does require some work to get used to the technique.
◼️ Keep Practicing
Most overspray issues happen to beginners because they’re not used to how sprayers operate. If you want to work on your vehicle, it might help to practice on other items before you apply the paint to the surface that requires work.
You can find videos and blogs online that take you through the various techniques that can cause oversprays.
When you become familiar with your equipment, it is much easier to avoid potential surprises.
How to Properly Use a Clay Bar
Your vehicle gets exposed to numerous airborne contaminants daily. These items stick to the finish, causing potential damage if left unaddressed.
When you apply a clay bar, you can remove the potentially corrosive items that could ruin your paint. Regular washing doesn’t always remove the items from the surface. That’s why detailing with this product makes sense.
If you’ve had recent overspray, the clay bar works to remove the contaminants in the same way it might take off a crusty bug from your front fender.
After you soften the clay, spray the affected area with an appropriate lubricant. Instead of using small circles or switching directions while working, keep gliding the bar in the same direction across the surface.
You’ll feel and hear the clay picking up the contaminants on the vehicle’s surface as you work. Try to avoid applying too much pressure while working because you could end up scratching or marring your finish.
After a few passes, it should feel the roughness is gone. Once you achieve the result you want with the overspray issue, you can move to the next section.
Always keep the freshest side of the clay on the paint. It helps to inspect the product after a few swipes to ensure the contamination you’ve picked up doesn’t impact the clear coat.
When you detail a car with clay, the worst areas tend to be the horizontal surfaces, the spots behind the wheels, and the back end. You can also use a clean bar to work with your wheels and windows.
Should I Buy a Clay Bar for My Car?
I love using a clay bar to clean my car because it delivers results quickly. You should plan on working for at least an hour on an overspray issue to correct the problem.
The one problem with this magic solution is that you cannot drop the clay on the floor. If you do, your best choice is to throw it away.
Once you’ve finished claying the vehicle, it helps to polish and wax the surface to ensure it has the protection you want.
A clay bar doesn’t cost much, but it delivers some impressive results! That’s why I keep a handful of them available in my garage at all times.