
When you’ve been working on a hobby build for several months, it feels good to finish the painting portion of the project. It might be tempting to start rushing through the final steps so that you can hit the road with your wheels, but you don’t want to take any shortcuts.
A few extra steps are necessary after your final application of clear coat gets applied. By investing a little spare time during those last stages, your paint will last for much longer.
Properly finishing your paint job is the difference between having a good or fantastic look for your vehicle. You could take a buffer to it for a long-distance look, but it will look much better when you understand how color sanding works.
What Is Color Sanding?
Color sanding is a task that smooths out the clear coat applied to an automobile finish. When it is time to start buffing the paint, this step ensures that you receive a mirror-quality finish with your work. Although the task isn’t difficult, it does require lots of time and patience to complete.
You need some supplies available to correctly color sand an automobile.
- A bucket of clean water with a drop of dishwashing soap.
- 600-grit sandpaper.
- A sanding pad or block.
Although some technicians or paint specialists prefer something more refined, such as 1,200-grit or 1,500-grit, the 600-grit sandpaper for the first sanding does the best job of removing textured surfaces that develop when spraying a clear coat.
When you spray several clear coat layers on your car, the peel-like effect builds up considerably. If you start with sandpaper that doesn’t have the correct grit levels, you won’t cut off the high points on the finish. You’ll be rounding them over instead.
It also helps to use a rubber sanding pad instead of a solid block so that the sandpaper conforms to the body shape with each panel. You’re less likely to put grooves into your work than if you’re catching the edges with something firm.
You can use a standard sanding block on flat surfaces. It helps to sand in different directions to give the area a consistent result instead of risking everything on one spot of the finish. For this step, you’ll only dip the block in the water while keeping the surface lightly damp with a wet rag.
Steps to Follow When Color Sanding Your Automobile
If you want to create a mirror-like finish for your hot rod, sports car, or automobile, here are the steps to follow to have a successful result.
1. Clean it up with a towel.
After sanding an area on the finish, wipe the area with a dry, clean towel to see if there are any high spots present. It sometimes helps to use an air nozzle to remove moisture from specific locations.
If you have any high spots on the vehicle, they’ll show up as a dull area. When you’ve gone too low, you’ll see it appear darker.
You’ll need to keep sanding with the 600-grit sandpaper until there aren’t any more spots left to find.
2. Repeat the sanding and drying process.
When you’re working on those high spots, it helps to keep checking on your progress. If you rub an area too aggressively, it’s relatively easy to take away more clear coat than necessary.
Although color sanding involves a lot of work, the attribute you want to focus on is patience. When you can get an even result during this first stage of the process, your paint will look fantastic once you can start buffing.
Some creators try to shortcut this step by using a power sander. Don’t fall for the temptation! You will end up going deeper into the coat than necessary, potentially forcing you to put on another clear coat layer and restarting the process.
3. Add a guide coat to the surface.
When you have everything finished from the 600-grit sandpaper, it helps to add a guide coat to the vehicle’s surface. It is a non-catalyzed, over-reduced primer or a nonmetallic base color that shows the remaining scratches from the initial wet sanding step.
This work fills them in so that they become more visible when you’re ready to proceed to the next step.
You want to apply the guide coat lightly. You should be able to wipe it dry with your fingers in an area that hasn’t received sanding.
Since it fills in the spots, you don’t want to use it for the first sanding because the product plugs the sandpaper before getting it removed.
4. Wet sand the entire surface.
You’ll want to use 2,000-grit sandpaper for this step. Once you’ve applied the guide coat, run the more delicate paper across the entire surface. It will remove the scratches from the 600 product while leaving a finer scratch to buff once the sanding work is complete.
Although that means you’re putting in more time now, it ends up being less overall since there’s less work that needs to get tackled during the buffing stage.
The key to a successful experience at this stage is to keep the surface wet the entire time. Adding some consistent lighting while completing the work is also helpful. This combination makes the scratches easier to see so that you know you’ve sanded them enough.
Keep watching out for the curvy areas on the vehicle’s exterior while using the fine-grit product. You can swap to the rubber pad for those spots or alternate parallel movements with strokes at 45 degrees to prevent going through the clear coat – or even the basecoat.
Why Should I Use a Sanding Block for Color Sanding?
Some people might wonder why the cost of a rubber sanding block makes sense for this work. If you only use your hands to tackle the clear coat, you create more highs and lows on the surface because the pressure isn’t getting applied evenly.
When you sand by hand, small gaps between the fingers create ridges that can appear in the color sanding process. You’ll also work faster with a block because more of the sandpaper stays in contact with the painted surface.
You can expect to use several sanding discs or papers to complete this process. For the average automobile, it takes up to five to get the hood flat. If you have a trunk, you’ll need up to four.
Each quarter panel and requires two or three discs to do the job right. That means you could go through about 30 of them to get through everything, which is why it requires so much patience.
The cost for these discs or papers is negligible. Even if you purchase high-quality products, you’ll pay around $1 for each one.
When you include the firm and rubber sanding blocks for this task, you can usually get everything for around $50. If you’re paying $75 or more, it’s probably too much.
Why Do Some Technicians Say to Use a Power Sander?
Some people like to use orbital sanders when they perform the color sanding work. Although it is technically feasible to do it this way, you must provide consistent pressure to the tool’s middle to reduce the risk of causing damage.
Since many orbital sanders have a speed switch right near the grip point, you must be exceptionally careful to avoid bumping that setting. Even one flick at the wrong time could spell disaster for your color sanding work.
The best option to pursue if you want to use this tool is to get a single-speed model or one that lets you lock in whatever setting you prefer to use.
Even then, you need to avoid the wet sanding process unless you’re using a battery-operated unit. That means a dry process occurs, causing you to churn through the sandpaper discs with regularity.
You could end up doubling the cost of your sandpaper expense by taking this approach on the off chance that some convenience becomes available.
Those that use an orbital sander still say that you should sand out the orange peel, dust, or other imperfections by hand.
If you want the best results, you must stick to hand sanding. When you’re less concerned about the finish and need some speed, some power towels might be helpful.
What If I Have Dimples or Dents in My Vehicle’s Exterior?
The most common mistake I see when people start color sanding involves how they manage corrosion.
When you have an older vehicle that needs a new paint job, rust can form underneath the coat to creating a bubbling effect. You might not see the early stages of corrosion when it begins, but you can certainly feel them there!
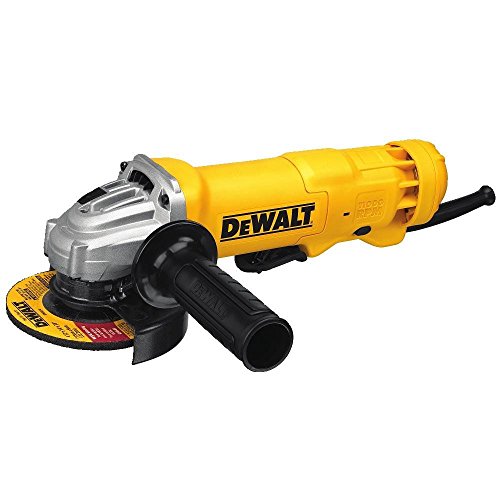
The only way to manage this situation is to get to the bare metal. You’ll want to sand or grind those areas with 80-grit materials to eliminate the problem. That’s where I like to use my DeWalt angle grinder. My 11-amp, 4.5-inch model comes with a paddle switch and a diamond blade to make fast work of the problem area.
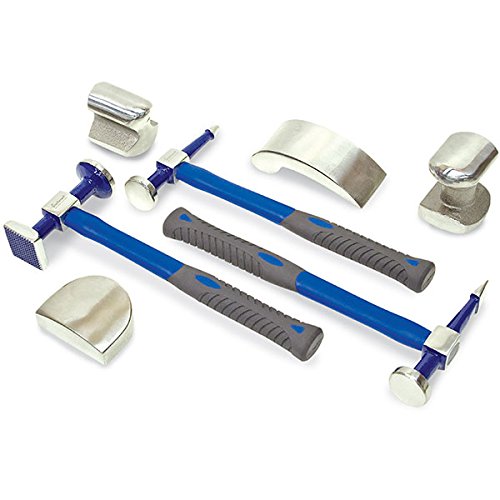
If there is a dent, it might need to get pulled before starting that process. I like to use the Eastwood Fender Set to shape metal with precision. It gets the job done reasonably well without destroying the budget.
After you’ve prepared the spot, you’ll need to use a premium body filler to level the surface. If you only grind and paint, you’ll see gaps in the surface from where you eliminated the rust.

I prefer to use Evercoat Rage Gold when I need to tackle some rust spots. It includes a blue cream hardener that delivers a beautiful consistency that spreads smoothly and offers an excellent sanding surface. It eliminates the peel back so you can even feather edge with the lightweight material.
Once the filler sets, you can apply the base coat, clear coat, and do the color sanding on top of that.
◼️ Then You Can Finish with the Buffing
I prefer to do the buffing by hand when it’s time to create a mirrored shine. It feels like the job is more complete that way.
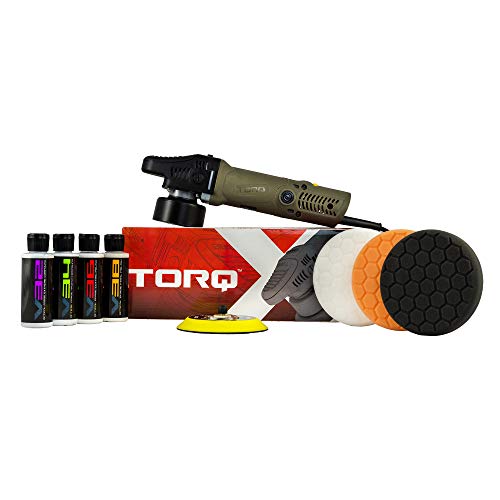
If you want to take a quicker route, I recommend the Chemical Guys Random Polisher Kit. It comes with several compounds, pads, and polishes for a reasonable price.
This product is the one I use when I’m managing the daily care needs for my car. If I’ve just sent it through a wash and want to apply wax, sealant, and glaze, the work gets finished in a few minutes.
Although it has a 7,800 RPM high-speed setting, I love the lower end at 2,800 RPM to give the surface the detailing work I want. It’ll take care of the scratches and defects while having enough stability to create precise results.
With the switchbacking plates, you can polish any area without difficulty because it delivers a streamlined user profile.
A Final Thought on Color Sanding
I know that it is tempting to take shortcuts with this work. When you’re young and working in the shop, a 16-hour day seems like nothing. Back then, I could finish the color sanding on a couple of projects.
Today is a different story. If coffee isn’t part of the equation, it’s a slow start and finish to the day. It’s a good day when one project gets completed.
Although you can invest in a decent orbital sander and high-quality sandpaper to get the job finished, it is essential to proceed with caution. It is easy to develop low spots that can hit the base coat if you’re not careful.
That’s why the only power tool that hits my car when getting the clear coat ready for a reflective finish is an angle grinder. I can clean up that rust, clean everything up, and rapidly apply some body filler for a smooth surface. After the base and clear coat get laid, the color sanding is a piece of cake!
Is it necessary to put in all this work? No. If you want your car to look its best, this methodology is the only option to use.
