
When you have guests visiting your boat, you want them to have a welcoming experience. Thanks to the exposure that the marine environment and the elements have on the vessel, your carpeting can look old and worn out in only a few years.
It needs frequent cleaning to prevent stains, mildew, and fishy odors from developing. Even when you’ve done all the maintenance required to keep it looking nice, it eventually needs to get replaced.
You could have the work done professionally, although the cost of such a service is significant. That’s why many owners decide to do the work themselves.
It’s easier than you might think to get the job done, but you’ll need to know what snap sizes to get before proceeding.
Boat Carpet Snap Sizes? Are There Two of Them?
Boats with carpeting typically have materials that snap into place instead of traditional anchors like staples or nails. The purpose of this methodology is to prevent holes from getting put into the vessel. When you need to replace them, you’ll find that the 5/8-inch size in kits isn’t always long enough.
You cannot settle for the cheap stuff when it is time to replace the carpeting on your boat. The only thing that will work is a marine-grade product. Everything else will wear out prematurely, retain moisture, or become a safety hazard.

Although color and style options tend to be fewer, you can still grab something like the Happybuy Marine Carpet for a competitive price. It arrives as a 6×23-foot, 6×45.9-foot, or 6×49.2-foot roll to make the installation process fast and easy.
If you have remnants after completing the work, it can serve as an outdoor porch or three-seasons room flooring option.
The Happybuy Marine Carpet comes in three colors: blue, black, or gray.
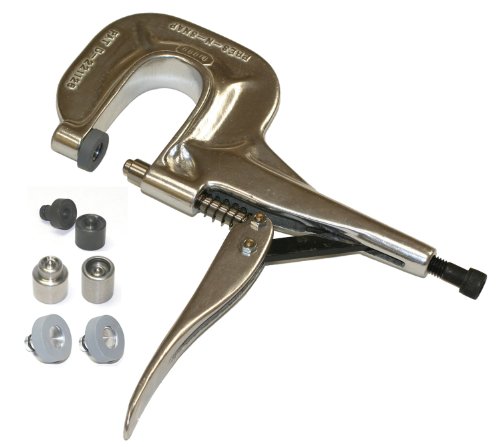
Once you have the replacement carpet available, you’ll need to get snaps and a tool that helps you install them. I prefer the Hoover Pres-N-Snap kit because of how fast and easy it makes the work.
After all the tools are in place to get the work started, you’ll want to implement these tips to have your replacement carpet installation go as smoothly as possible.
1. Think about the ounce weight for the boat carpet.
When you see the carpet ounce rating for the product, what you’re viewing is an indication of how many fibers the product contains. That means something built to be denser and heavier will be more durable.
The higher fiber count also looks better once it gets installed, although it can make the snap work a bit harder to complete.
When you use the cheaper carpeting, like a 12-ounce item, the backing can sometimes show if wrapping is necessary. Although a 32-ounce design is much harder to work with, you’ll also have fewer problems managing the maintenance cycle.
If you want something that won’t be terribly expensive and is of reasonable quality for a DIY installation, anything in the 20-ounce range is typically suitable.
2. Order a carpet sample before committing.
If you order boat carpeting online, it helps to have a sample of what to expect first before going in 100% with a specific product. The colors you see on a listing page aren’t always an accurate reflection of what you’ll get shipped to your address.
Product descriptions are helpful for sorting out the items you want from the ones you don’t need, but it isn’t the same as holding the carpet in your hands. Once you get the sample, it helps to examine the texture closely because it will help resist fading and stains.
3. Budget for the expense.
When you start pricing out the cost of a boat carpet installation, you can choose convenience or something more practical. The fastest way to replace or upgrade your current product is to order a precut piece from your vessel’s manufacturer.
Once it comes to your address, you can pull out the old snaps, install the new ones, and get the job finished in a couple of hours.
You can save a lot of money by doing the cutting work yourself if you need to install new boat carpeting. All you need to do is measure the dimensions and add about 15% to ensure you have enough space to get everything covered.
If you own a pontoon, the rules are a little different. You’ll want to plan on ordering enough carpet to double the boat’s length to ensure you have enough material for the installation.
How to Remove Unwanted Boat Carpeting
Getting rid of the old boat carpeting is the most intensive part of the replacement process. These tips can help you get through the work relatively quickly.

- If your boat is on a trailer, make sure it gets chocked to provide the stability needed to start ripping stuff out. The ROBLOCK 2 chocks are an excellent choice if your trailer meets the specifications listed for the product.
- Disconnect your battery and unload the tackle.
- Take pictures of any components that require removal. This step is especially crucial for the wiring under your dash. When it is time to put everything together, you’ll save tons of time.
- Remove the carpeted panels and hatches. If they’re snaps, they should pull right off. It helps to inspect them for damage to ensure they are still functional. If they’re riveted to the vessel’s infrastructure, you’ll need to drill them out. Work slowly to avoid breaking them.
- Keep all the hardware in labeled Ziploc bags to ensure everything stays together while working.
- If you encounter staples, a gentle twisting motion can remove them.
- Start in one corner of the boat. If you’re lucky, the carpet will pull up easily. Keep to a slow pace, handling the old material gently. Each piece serves as your pattern for the new stuff, so you don’t want to pitch it immediately.
- As you remove the carpet, label the back according to wear its placement was on the vessel. This step makes it much easier to know where the new product will get installed.
- If the boat carpet doesn’t pull up, you’ll need to scrape underneath the surface with a scraper blade, utility knife, or a similar product. This step can take a lot of time, so be prepared to work for the weekend.
- Continue until you’ve completed all hatches and panels.
- Inspect the bare deck for any mildew, rot, mold, or other damage. If you spot a problem, it must get addressed before continuing to the next step.
- The adhesive residue must get eliminated before the new carpeting can get installed. You can use a solvent, although your boat manufacturer might discourage that option. Some can soak into the wood, making it hard for the new product to install correctly.
- Once all the residue is gone, start the cleanup process immediately. You’ll need to dry-mop the deck, wipe the hatches, and then clean everything with lukewarm soapy water and a soft brush.
- Allow everything to dry overnight.
Some people say that using a heat gun works quite well for removing stubborn adhesive. Others have mentioned that they prep the deck using an orbital sander so that imperfections get scraped away.
The choice for that final step before installing the new carpet is up to you, although the best idea is to follow whatever your boat’s manufacturer recommends.
How to Install the New Carpet on Your Boat
When you install the new boat on your carpet, you’ll need to punch the snaps through the material so that they match the existing connectors. That means you’ll need to lay it out, get the wrapping done manually, and then get the fasteners through appropriately.
Since that can be painstaking work, many boat owners decide to remove the snaps to use an adhesive appropriate for marine carpets.
It’ll take time to remove carpet that you’ve glued to the deck on the next replacement. That means your choice is this: do you spend time on the snaps now or removing the glue later?
After you’ve made that choice, here are the steps to take to install the carpet.
- Unroll the new carpet on a clean surface. Keep the backing up to prevent it from becoming contaminated. Slowly work out any ripples or lumps that you see. It also helps to keep it oriented in the direction you want it to run. If it is being stubborn, you can weigh down the corners.
- Use the old carpet as a template. Keep the backing side up when matching up the pieces, starting with the largest ones, to ensure the orientation agrees. You’ll want to weigh down the patterns to prevent them from slipping.
- Using a marker, start tracing each piece a couple of inches larger than the patterns to ensure you have room for wrapping and securing the panel and hatch edges.
- If you have holes where hardware was in place, don’t worry about taking care of that work now. You can drill a small gap during the installation process.
- Use a utility knife for cutting the carpet. It requires a sharp surface, so you’ll need to replace the blade often to prevent unraveling and tears. If you have some loose fibers, it helps to trim them with sharp scissors instead of trying to pull them away.
- Take the large carpet pieces that cover the deck to the boat. Lay them out to ensure they fit as intended. If they do, you can install the snaps or apply the adhesive according to the manufacturer’s instructions. Keep the material flat and smooth, ensuring that each edge works with the vessel’s dimensions. Placing a heavy object near the center will keep everything stable.
- Roll the carpet to the heavy object without letting the material shift. Apply the snaps or spray the adhesive over a small area while unrolling the mat enough to glue the center of it.
- Once you have the center secure, apply more adhesive in small areas as you work from the middle to the edges. Use a floor roller to press the material down for a firm result. If any glue gets on the carpet, remove it with lukewarm soapy water before it dries.
- Start in the center of each hatch and panel, ensuring the carpet orientation is where it should be. Adhesives need at least an hour to set, but the snaps are ready to go immediately.

Should I Even Worry About Carpet Snaps on a Boat?
The pros and cons of snap-in carpet are relatively straightforward. You can pull it out or install something new relatively quickly. Although it takes time to install and match up the sizes, there’s a lot less mess than if you’re using glue. If you want something clean, going without carpet is another possibility.
Some snap-in carpets provide a simple, almost maintenance-free option for boats. Others can have the backing absorb water and take several days to dry. The extra padding is a benefit, and it might give your vessel a higher resale value.
The disadvantage is that the snaps can come loose, which could be problematic in some situations.
I prefer the zero-carpet method. Although that means I’m rinsing and scrubbing the deck a little more, it avoids the potential mess that the carpeting offers.
When I do run with this style, there is nothing better than Happybuy Marine Carpet for my boat.